
Home Menu
Now we move on to discussing each individual menu.
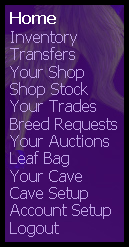
First off is the Home menu, shown below.
The first link of this menu is the Inventory link.
Here you will find all of your items, pears, etc you will collect while playing wajas.
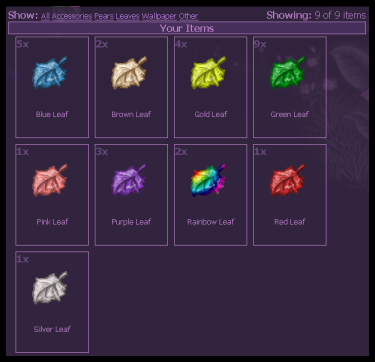
There will be tabs at the top of your screen (shown below)which will allow you to view individual groups of items, say in case you want to view only your pears. It also shows how many items you have, and how many you are viewing out of that number.

At the bottom of your screen you will have a drop down box, which will allow you to quickly skip to different pages of your inventory. On either side of this box is a "« Prev 24 Items" or "Next 24 Items »" link which you can click to go a single page forward or backward.
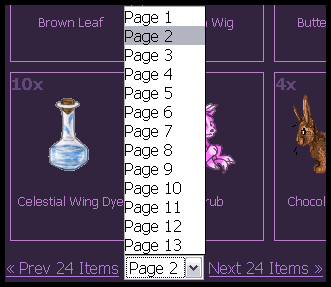
All of your items will appear in individual boxes, and will be in alphabetical order.
If you click one of these boxes, you will be given different options for your item.
Most items have Transfer, Sell, Auction, Trade, Discard, and Cancel options.
If you click Transfer, a new box will appear in place, with a "Send To:" field, along with "pick a friend" drop down box, "Quantity" field, "Go" button, and "cancel" option.
In the "Send To:" field you enter a players ID number in order to send that item to them.
The "pick a friend" drop down is for picking a person on your friends list to send the item to.
The "Quantity" field, is for entering the number of items you wish to send. (1 by default).
Go is for completing your transaction, and cancel is of course to cancel it. If you cancel, your item's box will go back to the options you got when you first clicked on it.
If you wish to sell the item, click on the "Sell" text. You will then have a box with a quantity field, go button, and cancel option. If you choose to sell the item, and press go, the item will be sent to your User Shop. I will discuss this in the "Your Shop", and "Shop Stock" sections of my guide.
The "Auction" option is still under construction. In the future it will allow us to put items on the market where the item will be sold to the highest bidder among other players.
The "Trade" option is also still under construction. When it is done it should allow people to safely propose combinations of wajas, wc, items, cwp, etc, to each other for trade, without having to worry about one player trying to rip off another.
The "Discard" option is not in effect either. I expect its more or less a "trash" function, though I can't for the life of me think of a reason to trash ANYTHING wajas related!
"Cancel" of course, closes the options, and allows you to see your item box again.
There are other options you may run into as well.
The first of these is the "Equip" option. By choosing this you will be taken to a list of your wajas which will look something like this:
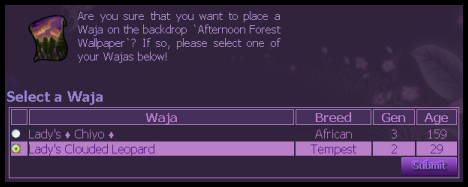
To equip the item, select a waja as shown, and then press the "Submit" button. (Note: Sorry if the picture looks a little odd; I had to crop it because i have over 600 wajas to choose from ^^;) The item will then become equipped to your waja. We will discuss how to remove these items later on in the "Your Cave" section.
Next, is the "Feed" option. This option is attached to pears. When clicked, you will be taken to a screen resembling the one you saw for equipping items. It acts in the same way. Choose the waja you wish to feed the pear to, and click submit to carry out the action.
Dyes, Rock Wajas, Plastic Wajas, Lollipops, and Frogs all have the "Use" option. When "Use" is clicked, you will be taken to the same type of screen type used for "Feed" and "Equip".
But there is a difference with the dyes. When you click submit at the end of your waja selection, you will be taken to a whole new screen. I will explain this new screen further on the "Guide To Dyes" page.
The "Open" option is reserved for easter eggs. When functional, you may use this option to destroy the egg to gain the item inside of it. See the Items section in the Easter Eggs subcategory for further information.
"Create Waja" is an option that is of course attached to tokens. When selected you will be taken to the create custom page. Please see the "Guide To Customs" for more information.
The final two options currently in existence are the "Move" and "Release" options, which are only found on the Chocolate Bunny item. Estuko has been very secretive about what the chocolate bunnies are for, and there are lots of speculations, and rumors about what she has in store for them. For now, these options do nothing. My personal speculation on the Chocolate Bunny? From reading past news posts by Estuko, I'm thinking she may be in the process of making them breedable non-wolf pets.
Quote by Estuko:
"Sometime in the future I had hoped I could add some non-wolf pets to the site, not a lot, but just a few to offer a variety in pets. What would you guys think if a horse, shark, bird or something appeared that didnt have any dog traits?
Poll Results:
Yes: 2109
No: 1161
Maybe: 2613
Yes - You'd be ok with it
No - You'd hate it
Maybe - You'd have to see the pet first."
When you first come upon the "Transfers" page, please take note that there are three tabs labeled "Item Transfers", "Bank Transfers", and "Waja Transfers" in the right corner, and that you are currently on the "Item Transfers" tab, as shown below.
![]()
By clicking each of these tabs, you may navigate through the three different types of transfers.
First, we will be discussing the "Item Transfers" tab, which appears as follows:
![]()
As you see, you have two sections labeled "Incoming Transfers" and "Outgoing Transfers".
Incoming transfers are those which you are receiving.
Outgoing transfers, are your transfers to other players.
For both sections you have two columns labeled "Item", and "Action". And between these two columns is a column labeled in the top section as "Sender", and on the bottom as "Recipient".
In the "Item" column, will first be the number of items being sent in parenthesis, followed by the name of the item(s).
In the "Sender" & "Recipient" columns is the name of the sender or recipient that also doubles as a link to their profile. Directly below this is the date on which the transfer was started.
In the final "Action" column, your options slightly differ between outgoing, and incoming transfer sections. In the incoming transfers section, you have the option to either "Accept" or "Decline" the transfer, whereas in the outgoing transfer section, you are only given the option to cancel the transfer.
Moving on to your "Bank Transfers" tab, your screen should look like this:
![]()
There is no difference in the "Sender/Recipient" column, or the action column from the "Item Transfers" tab. The difference is in the center "Amount" column, which simply tells you the amount of wc that is incoming or outgoing.
The final tab is the "Waja Transfers" tab, which should appear something like this:
![]()
(Note: Recipient names and numbers have been blurred out for privacy)
Again, the first and last columns (Sender/Recipient, and Action) are the same, and the center column differs. It is titled "Waja" and contains first the date and time the transfer was started, followed by the name of the waja, which also doubles as a link to the waja's profile.
The "Your Shop" page is a rather simple page appearing something like this:
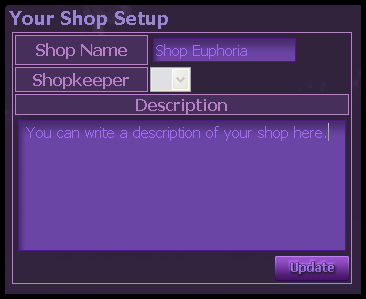
This page is a MUST for setting up your use shop.
To activate your user shop you must place a title in the "Shop Name" box.
It appears in the future we will also be given the option to choose a shopkeeper image as well.
Writing a description of your shop in the "Description" box is totally optional.
When you are done, and ready to open your new shop, press the "Update" button.
You may now place items in your shop to sell, which we will discuss in the next section, "Shop Stock".
Your shop stock area is for pricing, and organizing items you have put into your shop via their "Sell" option on the "Inventory" page.
The entire area looks something like this:
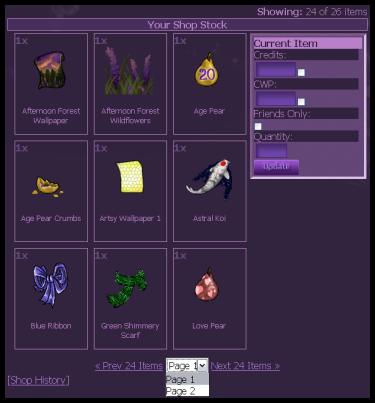
(Note: I cropped several rows of items off to make the image smaller. Also, the "« Prev 24 Items" link is only visible if you are on a page other than page one.)
In the upper right-hand corner the "Showing" text will tell you how many items you are currently viewing, out of the total amount of items in your shop.
Below that, in the "Your Shop Stock" table, you will see cells containing items which you have placed in your shop.
These cells show how many of the item are in your shop, and when clicked, highlight, and the name of the item displays above the selling options, where selling price, etc, may be edited, as shown below.
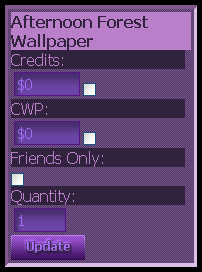
Among these options are "Credits", "CWP", "Friends Only", and "Quantity".
First is the "Credits" option. Here you would fill in the amount of WC that you are willing to sell your item for. You may also leave it blank, if you wish only to sell the item for CWP.
After you have filled in the amount of WC you wish to sell the item for, click the small white box next to the option, to check it off, and confirm that you wish to sell the item at said price.
The "CWP" option works in the same way as the "Credits" option. It may also be left blank if you wish to only sell the item for WC.
Next, is the "Friends Only" option. If you check this white box off, only people on your friends list may purchase the item.
Finally, is the "Quantity" option. This option is for choosing how many of this item you wish to sell. If this number is placed at 0, the item will be removed from your shop. If it is placed at a higher number, than the amount of item currently held in your shop, more will be added.
When you are finished editing the sale options of an item, you may click the "Update" button, to finish up, finally put your item on the market.
However, to view your shop as other people see it, you must go through your user profile, and click your "User Shop" link.
If you have more than 24 items in your shop, you will also be given the "Next 24 Items »" link, to see the next page of items in your shop; OR, you may simply use the drop-down box to quickly surf through.
The last link that you will have on the "Shop Stock" page, will be the "Shop History" link.
When clicked, you will be taken to a page showing your most recent 25 sales.
When on the history page, you will have records that will appear similar to the following:

(Note: Customer name has been blurred out for privacy)
There are four columns in your history labeled "Item", "Price", "Customer", and "Time".
The "Item" column tells you what item was sold.
The "Price" column tells you what price the item was sold for.
The "Customer" column tells you the screen name of the person who bought your item, which also doubles as a link to their profile.
The final "Time" column tells you the time, and date the item was purchased.
This area of the Wajas site is not yet complete.
This part of the site is where you go to manage your breed requests, whether they are those you, yourself have made, or those of which someone has made to one of your wajas.
The first part of your page are the current requests:
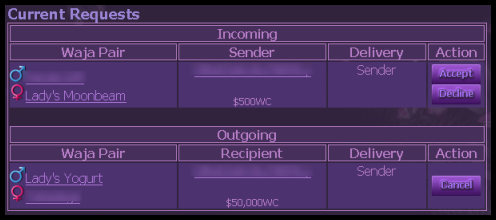
(Note: Names have been blurred out for privacy)
And within this part you have two sections labeled incoming, and outgoing. The first column will tell you the name of the "Waja Pair" that have been requested to be bred. The "♀" symbol represents the female waja of the pair, and the "♂" symbol represents the male.
The pair's names will also be displayed in this column, and double as links to their profiles.
The next column labeled "Sender"/"Recipient" contains the name of the person who is requesting a request to you in the "Incoming" section, and who you are requesting to in the "Outgoing" section.
Here names also double as links to player profiles.
The next column is labeled "Delivery". This column will tell who the pups are to be delivered to. If it says "Sender" the pups will be sent to whoever requested the breeding. "Father" or "Mother" will send the pups to either the male or female parent of the pups. If it says "Player" and then has the name of a player, it will be sent to a specific player as determined by the person who requested the breeding. The name of the player will also double as a link to their profile.
The final column is for accepting, and declining incoming requests, or canceling your own outgoing requests.
The second part of this page is for "Past Requests". It's basically for record keeping purposes, and show your past incoming breeding requests that you accepted, and your past outgoing requests that you made that were accepted.
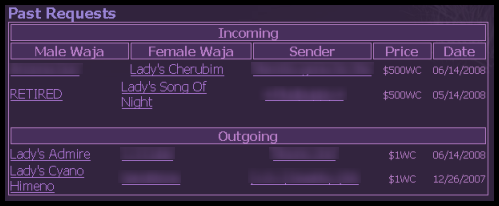
(Note: Names have been blurred out for privacy)
These are also split into "Incoming" and "Outgoing" sections.
These sections are divided into five columns.
The first column being the name of the male waja of the breeding, the second being the name of the female. The names double as links to the profiles of these wajas.
The next column is the name of the person that requested the breeding, or the name of the person that you requested to. This also doubles as a link.
The next "Price" column is how much was paid for the breeding.
The last column is the "Date" column where you may see the date that the breeding was requested.
This section of the Wajas website is not yet complete.
This link takes you to the "Leaves" section of your inventory.
You have the same options as in the main pages of your inventory here; the only difference is that you are on the leaf specific tab (found at the top of the screen among the other tabs).
We now arrive at the "Your Cave" page of wajas! Here you will find all of your wajas listed, along with their details, and links to their profiles!
We will be discussing each part of the cave shown in the image below.

(Note: I have over 600 wajas, so I cropped all of them out except for three I wanted to talk about)
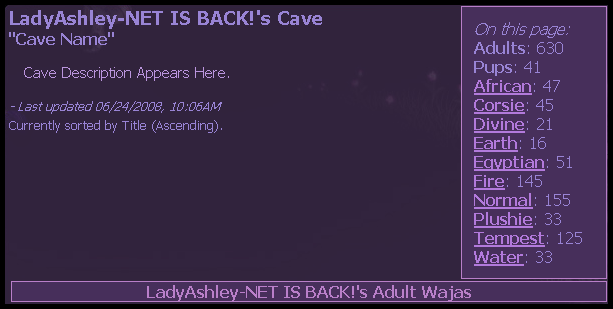
First of all the top of your cave will display your name, and the fact that this cave belongs to you.
Beneath that in quotations will be the name you have assigned to your cave. (Which can be changed as you like) My cave is called "Euphoria".
Beneath that is an area which will contain your cave's description. We will discuss how to put in a cave description later in the "Cave Setup" section.
And below this is the time and date your cave description was last updated, and the text directly below that tells how your cave is organized. (Which will also be discussed in the "Cave Setup" section.
To the right of this area will be a box that looks something like this:
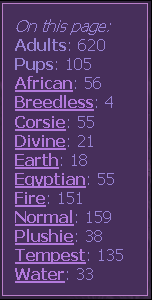
This tells how many Adult wajas you own, how many Puppies you own, and how many wajas of each breed you own. You may click the different breeds (which are links) to show only those wajas in your cave that are of a specific breed.
There are 11 breeds of waja total in the game including normal, egyptian, corsie, plushie, fire, water, african, earth, divine, tempest, and breedless. Links will only display for those breeds that you own.
Below all this is a table that says "(Your name)'s Adult Wajas!"
Here is where you will find all of your wajas that are 20 days of age or more.
These wajas have their details divided into three columns, and displayed like so:
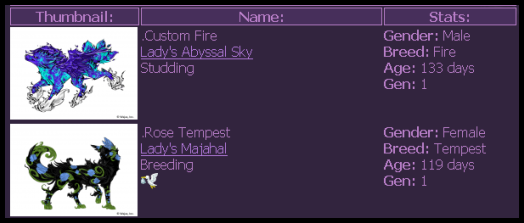
The first column contains thumbnails of your wajas. These thumbnails also double as links to your wajas' profiles.
In the second column are first, your wajas' title, then directly beneath that, their name. Their name also doubles as a link to their profiles.
If the waja is set to breed, a male waja will display the text "Studding", and a female waja will display the text "Breeding".
A stork icon will also be displayed under these things, if a waja is currently pregnant.
The last column contains a few choice details about a waja. Whether the gender is male or female, the breed, the age, and the generation of the waja.
If the waja is under the age of 20, it will appear in the "(Your Name)'s Young Wajas" section.
Here you can find all three transformations a waja will go through.
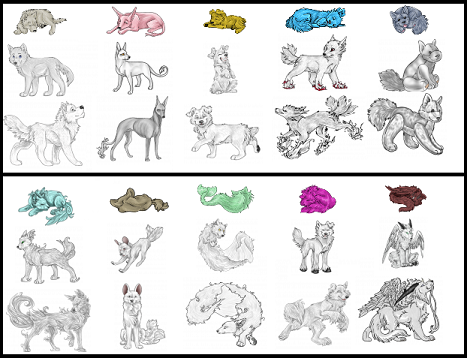
(Note: Wajas shown are all white with no markings or mutations)
A waja will go through four life stages before becoming an adult.
The first stage is newborn. A waja will stay a newborn until the age of 5 days.
At the age of 5 days the waja will proceed to the juvenile life stage. Here you will able to see your waja's base color.
When the waja reaches the age of 12 days it will take on the appearance of an adult. At this stage, its markings will appear on its body, but it is still not fully grown.
Finally, at the age of 20 days, your waja will leave the young wajas section of your cave, and become a breedable adult!
Now that we have talked about the basic cave layout, we'll now discuss what goes on inside the waja profile.
So click a thumbnail, or name of waja, and you will be taken to that waja's profile.
Once there, you will see that this page is divided into sections.
The first section is the details section:
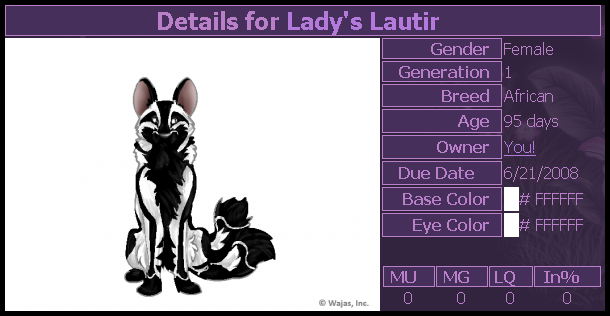
At the top of this section you will notice the text "Deatils for (waja's name)" This text also doubles as a link to that waja's profile, though i'm not quite sure why!
Directly beneath this, on the left-hand side, will be a picture of your waja. At any time during the game you may click it to refresh your waja's image. Refreshing will update a waja's picture from puppy to adult form when it is old enough, and show items that are currently equipped to it. (If your image does not refresh on its own.)
On the right of this section you will have many different details.
Gender: whether the waja is male or female.
Generation: what generation down the blood-line this waja was born in. Generation 1 wajas (or Gen 1 for short) are custom wajas created with tokens. When two gen 1 wajas breed their puppies are gen 2. when two gen 2 wajas breed their puppies are gen 3, and so on and so forth. If a gen 5 waja is bred with a gen 7 waja though, the generation will be gen 8. It's always +1 to the highest generation in the pair.
Beneath generation, is the waja's breed. There are 11 breeds of waja including Breedless, Normal, Egyptian, Corsie, Fire, Plushie, Water, African, Earth, Divine, and Tempest.
Below breed is the age of the waja. Puppies remain in the "young wajas" section until the age of 20 days, when they become full adults.
Owner is who currently owns the waja. The owner's name also doubles as a link to their profile.
Due date will appear only if your waja is a pregnant female. It will tell you what day your waja is due to have puppies.
While playing wajas, colors are all translated into their hexadecimal code. A sample of the color will be placed next to its code for reference.
Base color is the color of the waja's fur beneath all markings, and mutations.
Eye color is the color of its eyes, of course. For fires this color also represents the color of the flames on the feet.
Next you will see several small boxes labeled "MU", "MG", "LQ", and "In%". The boxes will have numbers directly below them which range between 0 and 100.
"MU" stands for mutation gene. This effects the probability that puppies bred from this waja will have or carry the parent's mutations. The closer to 100 the more likely they are to have or carry.
"MG" stands for male gene. This effects the chance that male puppies will be born. A male gene of 0 will only yield female puppies. Male gene of 100 will only yield males. So a male gene of 50 is preferable so you receive equal amounts of both genders.
"LQ" stands for litter quantity. This is the most important gene. It effect how many puppies your wajas will have per litter. Low LQ will only yield one or two puppies while very high LQ can yield three or four. Four puppies is the max litter size for a waja.
"In%" stands for inbred percentage. If your waja's parents shared a parent, or were siblings, then they will come out inbred. This percentage can be removed through the use of ice pears, but is still frowned upon.
Next there will be two side-by-side columns labeled "Mutations", and "Markings. There are lots of different possible markings in mutations. To see for yourself, you can visit the specific "Markings" and "Mutations" pages written on this website.
These boxes show which mutations the waja has or carries, and which markings the waja possesses.
An X in next to a mutation means that the waja shows this mutation. A / means it is carried in the genes. Please see the mutations page for more information. The color of the mutation will also be displayed, though some mutations are colorless.
Markings are named with their colors shown beside them. The numbers represent how well the markings show on the waja on a percentage scale. 10 being barely visible, and 100 vividly showing. The closer to 100 the better when it comes to breeding.
The next "Would you like to..." section is for purchasing and breeding wajas actions.
According to different situations purchase button may appear as follows:

The first in the row is if you already own the waja, the second if the waja is owned by someone else (but not for sale), and the third may be clicked if you wish to pay the price (shown below the button) to buy the waja.
There are also 4 different situations for the "Breed" button:

The first means the waja is still a puppy, and too young to breed, the second means you own the waja you are breeding to, the third is the price you must pay to breed to someone else's waja, and the fourth is if the waja is currently pregnant, and cannot be bred at that moment.
When a breed fee is set to $1 it is generally for personal stud only, but it never hurts to ask politely if the cave rules do not specify.
The next section appears if your waja happens to be pregnant.
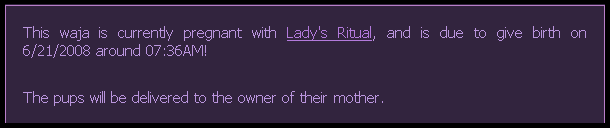
The first paragraph of this tells you the name of the waja that yours has been bred to (which also doubles as a link to their profile), and the date and time the puppies will be born.
The second paragraph tells you who the puppies will be delivered. This can either say to the owner of the mother, the owner of the father, a specific player, or to you.
If your waja has items equipped to it, they will show either directly below the "Would you like to..." box, or if your waja is pregnant, below the pregnancy box, like so:
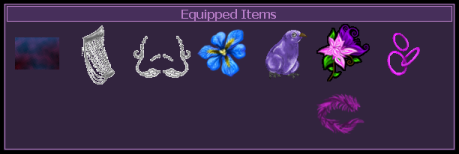
You can mouse over these items for their names and descriptions.
Next there will be a box that is split into two sections:
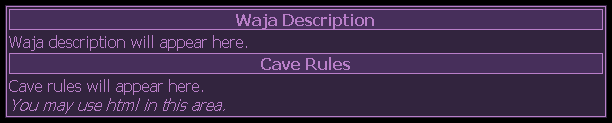
The first section is labeled "Waja Description". If you choose to write a waja description for your waja (which we will discuss below) it will appear here.
The second section is where your cave rules appear. These will also be discussed below in the "Cave Setup" section.
Now we move on to the bottom part of the page. There are seven tabs right below the "Cave Rules" box. Each has its own specific purpose.
You will by default be on the "Details" tab. Details may be updated at any time after making a change, by clicking the "Update" button.
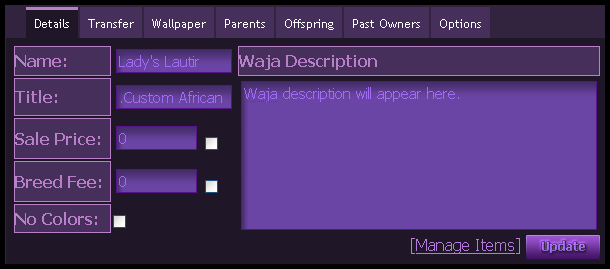
On the left-hand side of the details box will be several labeled entry fields.
First is the "Name" field. Whatever you type here will be the waja's designated name. Nothing is permanent though, and can always be changed later.
"Title" is something some people use for fun to tell what part a waja plays in their pack. Other people (including myself) use this for organization. While in cave setup you have the option to organize your wajas in different ways, including by title, which we will discuss in the "Cave Setup" section below.
If you wish to sell your waja, you may put a price in the "Sale Price" field. This must be entered in numbers with no spaces, commas, etc. (or else you may end up selling your wajas extremely cheap by accident) When you are done entering your price, check the box next to it. Click the update button to finalize your decision to sell.
If you wish to set your waja so that other players may breed to it, you may enter a fee for them to pay in the "Breed Fee" field. This acts in the same manner as the "Sale Price" field. Check the box next to it, and click update to finalize.
Checking the box labeled "No Colors" will hide the hexadecimal color code on your waja's profile from the view of other players. They will say "hidden". This way, you can keep players from knowing what colors you used to create customs, etc.
The large box on the right labeled "Waja Description" is where you may type about your waja, specific rules for it, or practically whatever your heart desires.
All of these last things in the detail tab must be updated by clicking the "Update" button to take effect.
The part of the details section that i want to talk about is the "Manage Items" link.
This will take you to a new page where you may arrange your items, or remove them as you please.
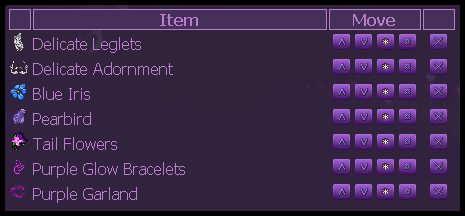
This page is divided into three columns.
The first column labeled "Item" will show a small icon of the item equipped to the left of its name.
The second column labeled "Move" contains four buttons for arranging your items on your waja.
The first button is the "Move item up" button. This will move an item one layer up on the waja.
An example of how these layers work is if you have a green scarf and blue scarf in the exact same spot, whichever one is on the higher layer will be visible over top of the other.
The second button is the "Move item down" button, and when clicked will move an item down one layer.
The third button is the "Above body" button. This button may be clicked to alter whether the item is shown below or above the waja's body.
The last button is the "Above mutations" button. This button may be clicked to alter whether the item is shown below or above a waja's mutations.
The last column is unlabeled, and contains a single button used to remove an item.
We now move on to the "Transfer" tab. This tab is used to transfer your waja to another player.
![]()
(Note: names on friend's list have been blurred out for privacy.)
Choose who you want to transfer your waja to either by entering their player/cave ID# (which is the same) into the box, or by clicking the name of a person who has been added to your friends list. (Doing this will automatically enter their number into the transfer field) When you are ready, click the "Transfer" button.
The waja will then be sent to the transfer NPC where it will stay in limbo, until accepted by whomever you sent it to. Until it is accepted, you have the option to cancel this transfer via your waja transfers which we previously discussed in the "Transfers" section.
A safeguard box should come up asking if you are sure you want to send this waja to (name and ID# of player). Click "yes" to send, or "no" to cancel the transaction.
The wallpaper tab is simply used to remove an equipped wallpaper, which does not appear on the "Manage Items" page as a normal accessory does.
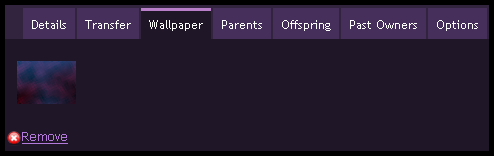
Simply click the "Remove" link to remove a wallpaper from your waja.
On the "Parents" tab, you will be able to view your waja's parents. (Though if your waja is Generation 1, the tab will display the text "This waja has no sire..." and "This waja has no dam...")
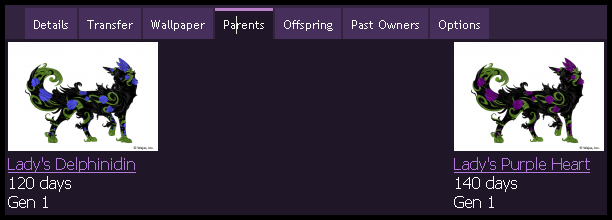
On the left side is the father of the waja. On the right side, the mother. Below a small thumbnail of each parent (which double as links to their profiles) are their age, and generation number.
Next is the "Offspring" tab, where you may see the names of every puppy your waja has sired, or birthed.
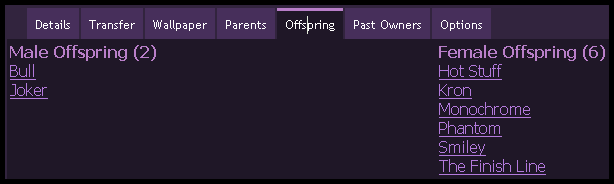
Male puppies are displayed in the left column, and female on the right. Each column will tell you the number of each gender of puppy born to this waja. The names of all pups double as links to their individual profiles.
The "Past Owners" tab may be used to see every person who has, in the past, owned your waja, all the way down to the person who bred it. Each player name doubles as a link to their profile.
This can come in use when looking to buy a sibling of a particular waja. By looking at who originally bred the waja, you can visit their page to see if they have more puppies available, or to ask if they would be kind enough to breed one for you.
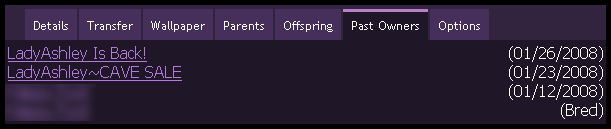
(Note: Original owner's name has been blurred out for privacy)
The final "Options" tab currently only serves one purpose.
That purpose is to "Retire" a waja. When a waja is "Retired" it disappears, and is only accessible if you know its ID#, or if you view it by clicking its name under the "Offspring" tab of one of it's parents.
It is no longer breedable, buyable, sellable, transferable, etc, etc, and for all purposes, no longer belongs to you, or anyone else.

If you wish to retire your waja, check the box, and click the "Retire" button. The page will display a final warning asking if you really want to retire your waja. The choice is up to you.
The "Cave Setup" page is used to organize your cave, and wajas.
First are the "Cave Name" and "Description" fields.
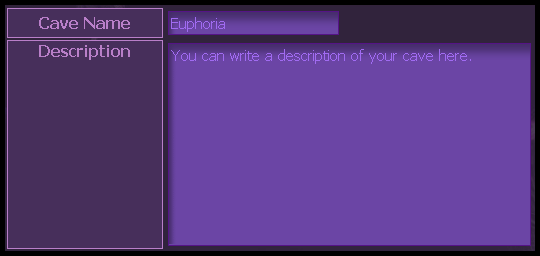
Whatever you type in the "Cave Name" field will be displayed to whomever visits your cave beneath your user name, and description will appear beneath the name of your cave in the area above your wajas, and to the left of the breed shortcuts, as shown below.
Next are the "Sort By" fields.
The first of these is a drop down box where you may choose how you want your wajas to be ordered. You may order by Name, Age, Breed, Title, Gender, or Generation.
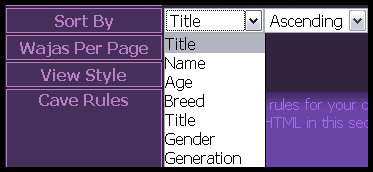
In the next drop-down box you may choose whether you want this order to be ascending, or descending. (First first, or last first)
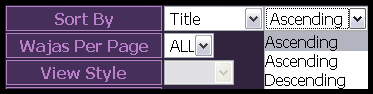
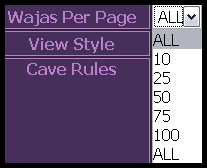
The next field is the "Wajas per page" field. Here you may choose to have your cave divided into pages so that all of your wajas do not display at once. You have the option to show 10, 25, 50, 75, 100, or ALL of your wajas per page.
Next is a "View Style" field and drop-down box, which currently has no function.
The next field is the "Cave Rules" field.
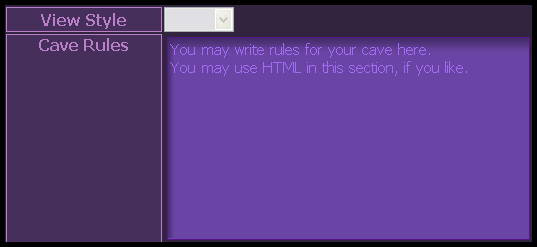
Whatever you type in this box will appear on the profile of every waja you own, in the "Cave Rules" section of their page.